Create an IDE with Godot
I wanted to create a game, but I created a basic IDE for the Click4 fantasy console.
All links to products are affiliated link, you pay the same price and I get a small percentage, thanks for your support!Posted on March 30, 2022 · 15 minutes read
I wanted to create a game, I wrote a compiler.
Click4 is a fantasy console with an original creation constraint and very strong technical limitations. So strong, that I ended up writing my own compiler and IDE to successfully create a game on it.
In this article, learn more about fantasy consoles, cpu, assembler, compilers and Godot.
No complex details, I promise.
DISCLAIMER: My implementation is probably very naive and far from what a real compiler and IDE could be. The goal is to understand the basics.
Why Click4 is a real challenge.
Click4 uses virtual "cartridges" to store its games. The cartridge is actually an image, a .png file that the console can read. Each pixel of this image will be interpreted by the console as an instruction, a color, a value, a sound.
For example, a black pixel will be read either as "do nothing", or as the color black, or as the value 0. The meaning of each pixel will depend on the pixels that precede it.
It is possible to create your game by drawing an image, pixel by pixel, in an image editor. You can also do it directly in the console.
In addition to this surprising constraint, there are also very strong technical limitations:
- A 4-bit CPU (16 possible values, from 0 to 15)
- Only 13 operations in assembly, a difficult language to use, very close to the machine.
- A memory of 4096 4-bit numbers, which must contain everything (code, RAM, sprites).
- No stack, no heap, so a complex memory management.
To succeed in creating a game on this console, I decided to create a simple IDE. Yes, it sounds a bit exaggerated, but it's for fun.
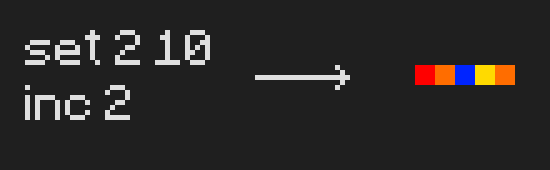
How to transform code into an image?
Click4 reads each pixel of the image one by one, and translates it into an assembly instruction or a value.
At first, my plan was simple:
- To be able to program a game by writing assembler operations in a text editor.
- Transform this text into an image readable by Click4.
Just write a program that reads each line of code, associates it with the right color and draws it on an image. Let's call it a Parser.
But as you guessed from the title, I'm not just going to do that...
Godot to program the editor?
I chose to create my editor with the Godot game engine. I know, it doesn't seem appropriate. But Godot has everything you need to quickly make a working application.
In fact, the Godot editor is itself programmed with Godot. So there are already a lot of widgets and systems to manage the GUI.
In only 1 hour, I already had a basic application to type text.
Everything is automatically responsive thanks to Godot's container system. And there is already a TextEdit node with many parameters (display line numbers, display a minimap of the code, highlight the current line, etc...).
I won't detail the IDE implementation in Godot. The important thing to note is that I had no trouble doing everything I needed with Godot.
How I came to create a language and its compiler
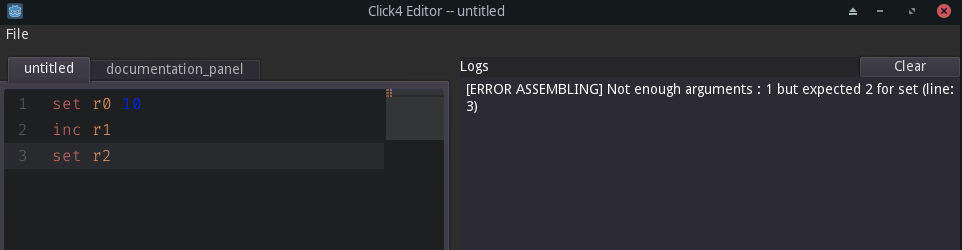
Too many simple errors to handle
I was making a lot of simple errors; forgetting a parameter, using the wrong statement, etc...
I decided to improve my Parser, so that it analyzes the code and helps me to find quickly the simple errors.
Difficult to make conditions or loops
In assembler, there is no concept of condition or loop. Instead, we use conditionnal jumps which allow to jump to a precise address in memory according to a certain condition. The CPU continues to execute the program from that address.
But with Click4, it's a different story. The "jmp" operation takes the position (x, y) on the image as a parameter.
Let's complicate things a little more? The final image has a resolution of 64x64 pixels. So we could imagine wanting to jump to position (35, 36) for example.
However, our cpu is 4-bits, so we can't represent a number higher than 15. We have to use 2 memory blocks (2 4-bits numbers) to represent a number higher than 15.
So I'm not going to give you a lecture on binary, but if we wanted to jump to (35, 36) we should write this instruction.
jmp 2 3 2 4
And that's not all. As soon as we add an instruction to our code, we have to update the jump address.
We will see later how I implemented labels to solve this problem.
Not enough operations
Here is the list of the 13 assembly operations available for Click4:
- 0 nop : no operation (do nothing)
- 1 set &arg1 arg2 : Set contents of register defined by ARG1 with value of ARG2.
- 2 copy &arg1 &arg2 : Copy the contents of register defined by ARG2 to the contents of register defined by ARG1.
- 3 inc &arg1 : Increment register defined by ARG1.
- 4 dec &arg : Decrement register defined by ARG1.
- 5 nand &arg1 &arg2 &arg3 : NAND the values of registers defined by ARG2 and ARG3 and store in register defined by ARG1.
- 6 crsz &arg1 : Increment program counter by 2 if register defined by ARG1 is zero.
- 7 jmp &arg1 &arg2 &arg3 &arg4 : Change program counter to position X(ARG1,ARG2) Y(ARG3,ARG4). Notice each coordinate is composed of two nibbles to be able to jmp on the whole screen.
- 8 rjmp arg1 : Increment program counter by ARG1 plus 1.
- 9 load : Load contents of X(R1+R2), Y(R3+R4) to R0 (X and Y use two nibbles).
- 10 save : Save contents of R0 to X(R1+R2), Y(R3+R4).
- 11 input &arg1 : Copy values of WASD or Up, Right, Down, Left into the register defined by ARG1.
- 12 draw : Draw area of screen with SourceX(R0+R1), SourceY(R2+R3), Width(R4) plus 1, Height(R5) plus 1, TargetX(R6+R7), TargetY(R8+R9)
- 13 qsnd &arg1 : Enqueue sound from register defined by ARG1.
No addition, division, logical operations or way to jump according to specific conditions.
However, it is possible to recreate these features from these 13 operations. For example, here is the code to add two numbers stored in the r0 and r1 registers:
;; add r1 to r0 and store the result in r0
@add
crsz r1 ;; if r1 == 0 return
rjmp 4 ;; otherwise jump to increment
jmp @endadd
inc r0
dec r1
jmp @add
@endadd
Note that I use labels for the jumps.
It takes a lot of code and more than twenty memory blocks just to do an addition. I wrote another version of the addition for 8-bit numbers. It uses 42 memory blocks...
The code will be unreadable and hard to maintain if you have to rewrite this each time. It should be possible to add operations, like "add" for example. The Parser recognizes the add instruction, and replaces it with the corresponding code.
From now on, we won't talk about a Parser anymore, but about a Compiler.
Creating a language and my compiler
Keywords and comments
I added a comment system, content that will be ignored by the compiler.
I also added a lot of keywords for registers, colors, sounds, numbers etc... They are then replaced by opcodes (0 to 15) at compile time.
set r0 0 ;; r0 will be replaced by the number 0 at compile time
set r2 red ;; red will be replaced by the number 1 at compile time
set r4 c# ;; c# (the musical note) will be replaced too
set r6 b0010 ;; binary notation will be replaced by 2
The Defines
I added a way to associate a value to a name. Very useful to create constants that can be easily modified and used in several places in the code.
#define player_start_pos_x 10
#define another_const 2
#define starting_HP 15
Labels
The labels are there to answer the problem of the jump. Here is an infinite loop that increments register 0.
@mylabel
inc r0
jmp @monlabel
At compile time, the "@monlabel" argument to jmp is replaced with the correct position on the image.
@monlabel
inc r0
jmp 0 0 0 0
The important thing for the compiler here is to read the labels once we have all the instructions. Indeed, imagine that we have this code:
jmp skip_line
inc r0
@skip_line
At the time of the jmp, the existence of the skip_line label is not yet known. Therefore, we need to:
- Read all the instructions a first time
- Store all the existing labels (and associate them with a position in memory)
- Replace the labels in all jumps with the right position.
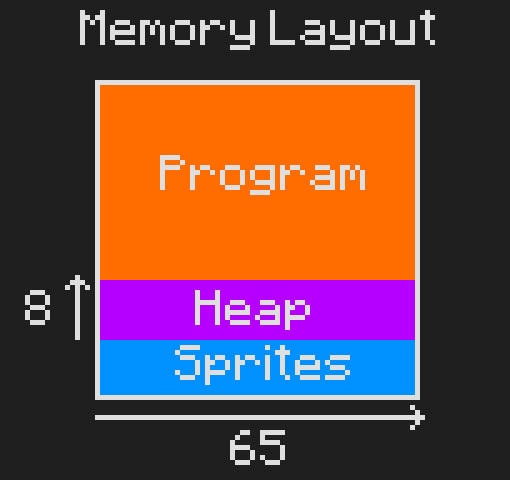
Sprites
Sprites must be stored in memory. This memory also contains our code. We have to be careful to differentiate them and not to overwrite our code with sprites and vice versa.
I have dedicated an area of the memory to the sprites.
![]()
We "draw" our sprites directly in the code.
;; put your game code here

== sprites

;; sprite 1
0 0 0 0 0 0 0 0
0 0 0 1 1 0 0 0
0 0 0 1 1 0 0 0
0 1 1 1 1 1 1 0
0 1 1 1 1 1 1 0
0 0 0 1 1 0 0 0
0 0 0 1 1 0 0 0
0 0 0 0 0 0 0 0

;; sprite 2
0 0 0 0 0 0 0 0
0 0 0 4 4 0 0 0
0 0 0 3 3 0 0 0
0 0 0 2 2 0 0 0
0 0 0 1 1 0 0 0
0 0 0 0 0 0 0 0
0 0 0 0 0 0 0 0
0 0 0 0 0 0 0 0
The compiler will automatically place them in our reserved memory.
![]()
We can then use some #define to store the position of our sprites, and use the draw operation of Click4.
The heap
Click4 has 15 registers to store values temporarily. To store variables flong term, we need to store them in our memory (which also contains the code and sprites).
We can use the save and load instructions of Click4. Let's store 5 at position (15,15) in memory.
set r0 5
save 0 15 0 15
This is not very easy to use. You have to remember all the positions, and make sure you never store multiple things in the same place.
I created a basic heap. A heap is a place in memory where you can store values and change them. When you make a call to new in C++, generally a space on the heap is reserved for you.
It is the operating system that takes care of giving the memory to the programs. In our case, we have to manage it ourselves.
Here is an example of how to use my heap.
#alloc player_pos_x 15

hload player_pos_x ;; load the value stored on the heap in r0
dec r0
hsave player_pos_x ;; save the value of r0 on the heap
At each #alloc, the compiler reserves a memory block to store our variable. I chose a starting position for my heap (63, 55). At each new allocation :
- We reserve the current position for the variable.
- We store its default value (15 in the example)
- Decrease the position for the next variable.

In the final code, the hload and hsave statements are replaced by load and save.
Normally in a heap you can also free variables, to free memory space. This one can't do that, the spaces are reserved forever.
Logical operators
We want to be able to use logical operators like OR, NOT, AND, etc...
We only have NAND with Click4. NAND has a very special property called functional completeness. From NAND we can recreate all the other logical operations!
One could even recreate a computer only with NAND.
An example with NOR:
;; r0 NOR r1 into r0
;; A NOR B <=> (A NAND A) NAND (B NAND B)
;; 						  NAND
;; 			   (A NAND A) NAND (B NAND B)
nand r0 r0 r0
nand r1 r1 r1
nand r0 r0 r1
nand r0 r0 r0
Conditions
In general we use logical operators in conditions.
Click4 only gives us crsz, which jumps 2 memory blocks away if r0 == 0 (otherwise it goes to the next memory block).
Well... this is enough for us to implement every other type of conditions.
We are going to implement two concepts found in other assembly languages:
- cmp
- a conditional jump set
The cmp operation compares the values in r0 and r1, and modifies r15 according to the comparison.
If r0 < r1, r15 = 1.
If r0 == r1, r15 = 2.
If r0 > r1, r15 = 0.
Then we can implement a set of conditional jumps, which will use r15.
- je (jump if equal)
- jne (jump if not equal)
- jg (jump if greater)
- jge (jump if greater or equal)
- jl (jump if lower)
- jle (jump if lower or equal)
You must always call cmp before any conditional jump, to update r15 properly.
Here is an example of use, if r0 is greater than r1 then we increment r1.
set r0 5
set r1 2
cmp
jg @r0_greater_than_r1
inc r1
@r0_greater_than_r1
;; more code...
arithmetic operations
You can only increment and decrement with Click4. I have rewritten addition and subtraction from these two instructions.
Adding two numbers means adding 1 several times (and vice versa for subtraction).
Then for division and multiplication, same system. Multiplying by X means adding X several times.
The algorithms were a bit more complex so to simplify my task, I wrote and tested them in python before translating them into assembler.
Here is an example with the addition of two 8-bit numbers. I created a int4 class to reproduce the behavior of a 4-bit number.
def add(r0, r1, r2, r3):
    while r2 > 0 or r3 > 0:
        if r3 == 0:
            r2 -= 1
        r3 -= 1
        r1 += 1
        if r1 == 0:
            r0 += 1
    return r0, r1

# unit tests
assert(add(0, 0, 0, 0) == (0, 0)) # adding zero to zero
assert(add(0, 0, 0, 1) == (0, 1)) # adding 1 to zero
assert(add(0, 1, 0, 0) == (0, 1)) # adding zero to 1
assert(add(0, 1, 0, 4) == (0, 5)) # no carry
assert(add(0, 10, 0, 6) ==(1, 0)) # carry
assert(add(1, 2, 0, 3) == (1, 5)) # carry + non null r0
assert(add(0, 3, 1, 3) == (1, 6)) # carry + non null r2
assert(add(1, 3, 1, 2) == (2, 5)) # carry + non null r0 and r2
I try to use as much as possible the operations available in Click4. That's why I only do increments, decrements and comparisons to 0.
I also did some unit tests to be sure that it works.
Here is the 8-bit add in assembler.
;; Add two 8-bit numbers
;; adds r2-r3 to r0-r1 into r0-r1

@8bitadd
;; while r2 > 0 or r3 > 0 {
;; or r3 r2 into r4
nand r4 r2 r2
nand r5 r3 r3
nand r4 r4 r5
crsz r4 ;; if r2 or r3 == 0 then return
rjmp 4
jmp @end8bitadd
crsz r3 ;; if r3 underflow then dec r2 too
rjmp 1
dec r2
dec r3
inc r1
crsz r1 ;; if r1 overflow then inc r0 too
rjmp 1
inc r0
jmp @8bitadd
@end8bitadd
;; }
Better input management
I have added an easier way to handle keyboard input.
Click4 has the input instruction which stores the state of the keyboard directional keys in a given register.
It is better to represent it in binary.
Let's say we use input :
input r0
If the up key is pressed, r0 = 1 or b0001 in binary. If the right key is pressed, r0 = 2 or b0010 in binary. If the up and right keys are pressed, r0 = 3 or b0011 in binary.
So I created a jump_if_pressed operation, which jumps only if a certain key is pressed. Here is an example, if the right key is pressed, we increment r0 :
jmp_if_pressed key_right @right_pressed
jmp @right_not_pressed
@right_pressed
inc r0
@right_not_pressed
;; do stuff
What I would have liked to add
With more time, I would have implemented :
- A stack, to be able to create functions and make recursive calls.
- A fixed size array, to store a sequence of values.
How compilation is orchestrated
In general we use the term compilation to talk about the process of transforming code into machine language, understandable by the CPU.
In reality there are several steps, and compilation is one of them.
I was inspired by these steps to create my compiler. The idea is to decompose the "compiler" into several parts, each with its own responsibilities.
A few terms to define to understand :
- Click 4 Assembler (C4ASM) : the operations included by default in click 4.
- Extended Click 4 Assembler (EC4ASM) : all operations and other features I added.
- Click 4 script (.cs4) : A file written in EC4ASM.
- Mnemonic : the name of the operation, for example set.
- Opcode : The code that must be transmitted to the CPU to execute the operation (for set it is 1).
This is how my compiler works:
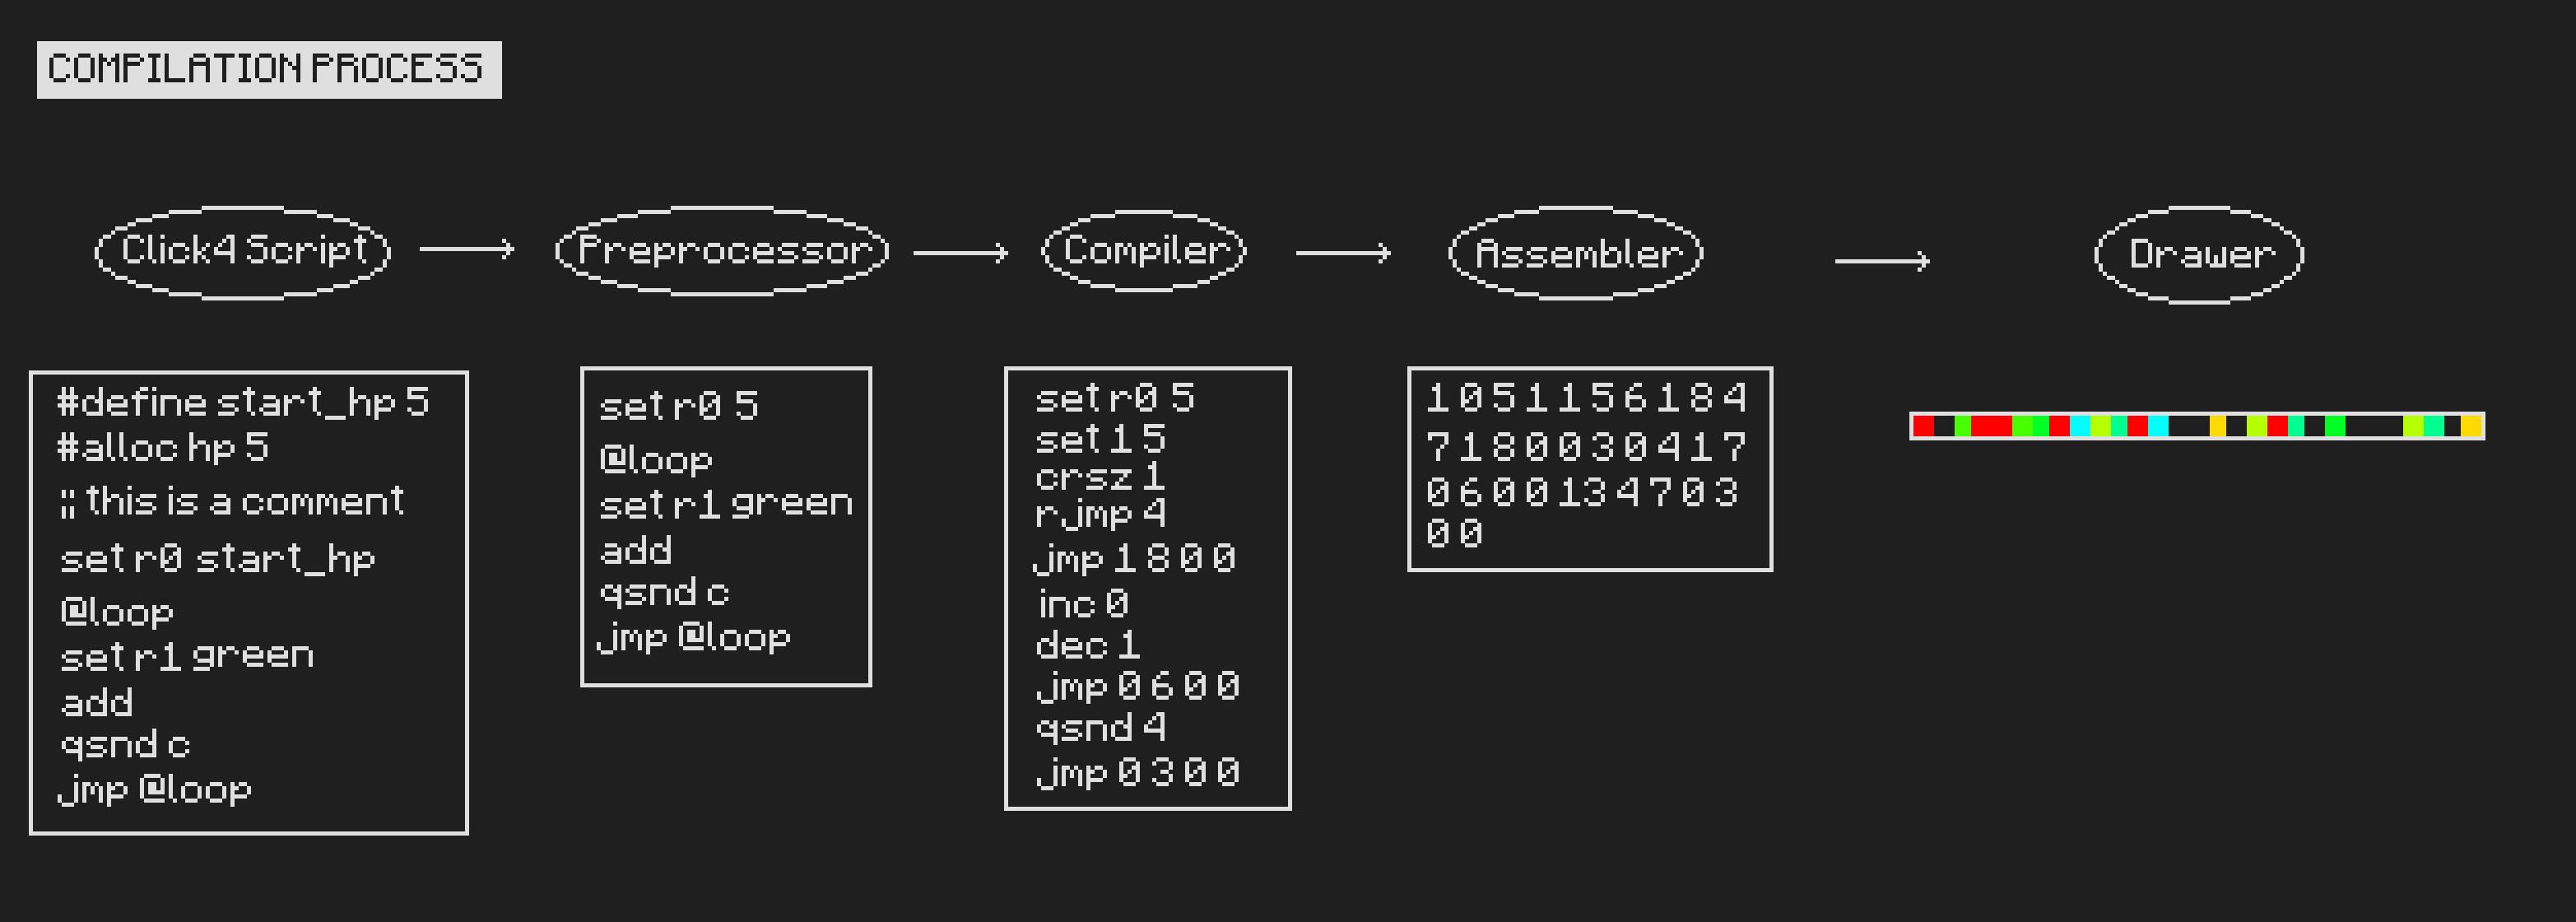
- Preprocessor
- Removes comments.
- Replaces all #define with the correct value.
- Reserves memory for the heap.
- Transforms the script (a string) into an easier to use data structure for the next steps.
- Compile
- Replace all EC4ASM operations with C4ASM.
- Registers the labels and replaces them with the correct addresses.
- Checks the validity of all C4ASM operations and their arguments.
- Assemble
- Transform all code into machine code (all mnemonics and keywords are replaced by their opcode).
- Drawer
- Draws the operations on the image.
- Draws sprites on the image.
- Draw the heap on the image.
And here is the final game !
I stayed on a very simple game, because even with this IDE, it's very complicated to create a game. The most complicated part was the debugging, I could only rely on my logs.
I made a clone of the game Kaboom on Atari 2600. But you collect cats instead of bombs. I chose cats because besides the musical notes, the Click4 can also play a meowing sound.
The game is called "It's raining Cats", which comes from the expression, It's raining cats and dogs in English.
You can see the c4script on my github.
Actionable
- Here are some Youtube channels to learn more about low level programming, stack, heap and the functioning of a computer in general.
- Make a game for the Click4 and send it to me. Even using the IDE it's still a challenge but I'm sure some of you will be able to do some amazing stuff.
- Try to create your own IDE and compiler for another fantasy console. There are many others, here is a list.
- Become a member of my Patreon to get access to exclusive content like the IDE source code, my day to day progress in video format with lots of interesting details, free games and lots more.
Resources
Acknowledgements
Thanks to @josefnpat for creating this toy, but also for helping me to understand how it works (he's working on a great game, check it out!).
It's thanks to these people who support me on Patreon and Ko-fi that I can work : Moey Mei, Rascal, Staren, Kel Pat, Poupipnou, les Tartines, Dysphobia (aka la crapule de l'espace).